Stream and record your games with a live scoreboard
Stream and record your games with a live scoreboard
Build a rugged tablet system for SimpleSportsCaster
December 1, 2020
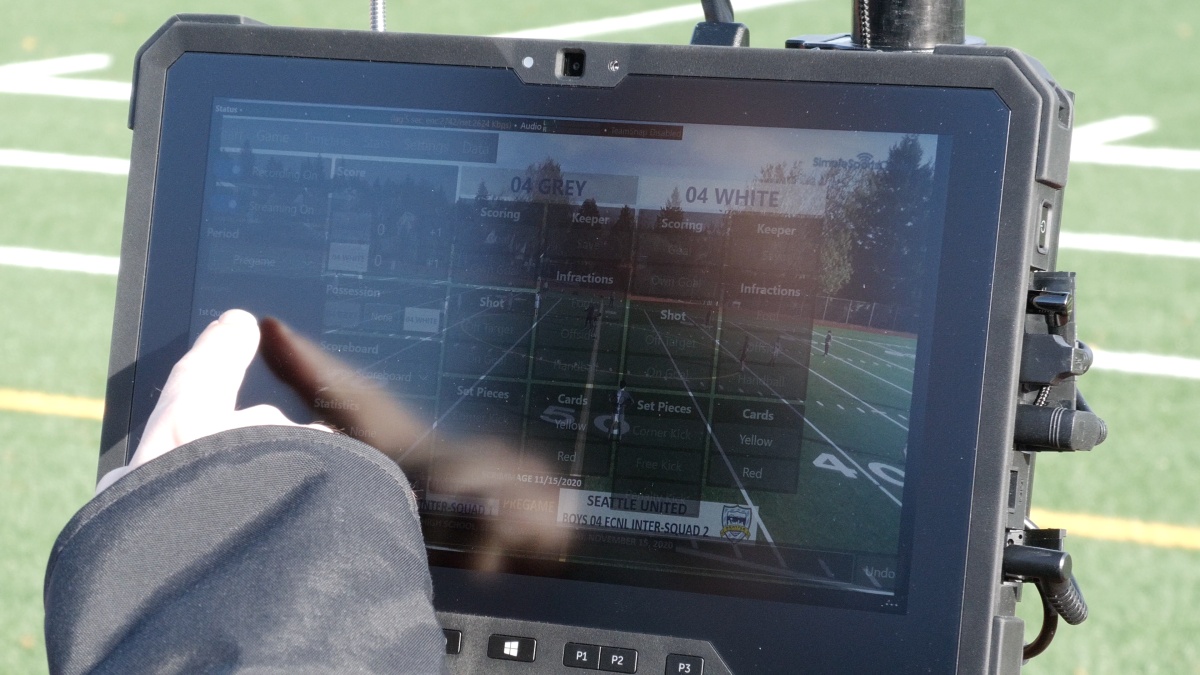
Seattle United FC asked us to build three SimpleSportsCaster live streaming tablets to go with the Hi-Pod systems they already use to record their ECNL games. Beyond needing to work with the Hi-Pod cameras, the main requirement was that the tablets had to be rugged enough to handle frequent use by parent volunteers in rainy Seattle weather.
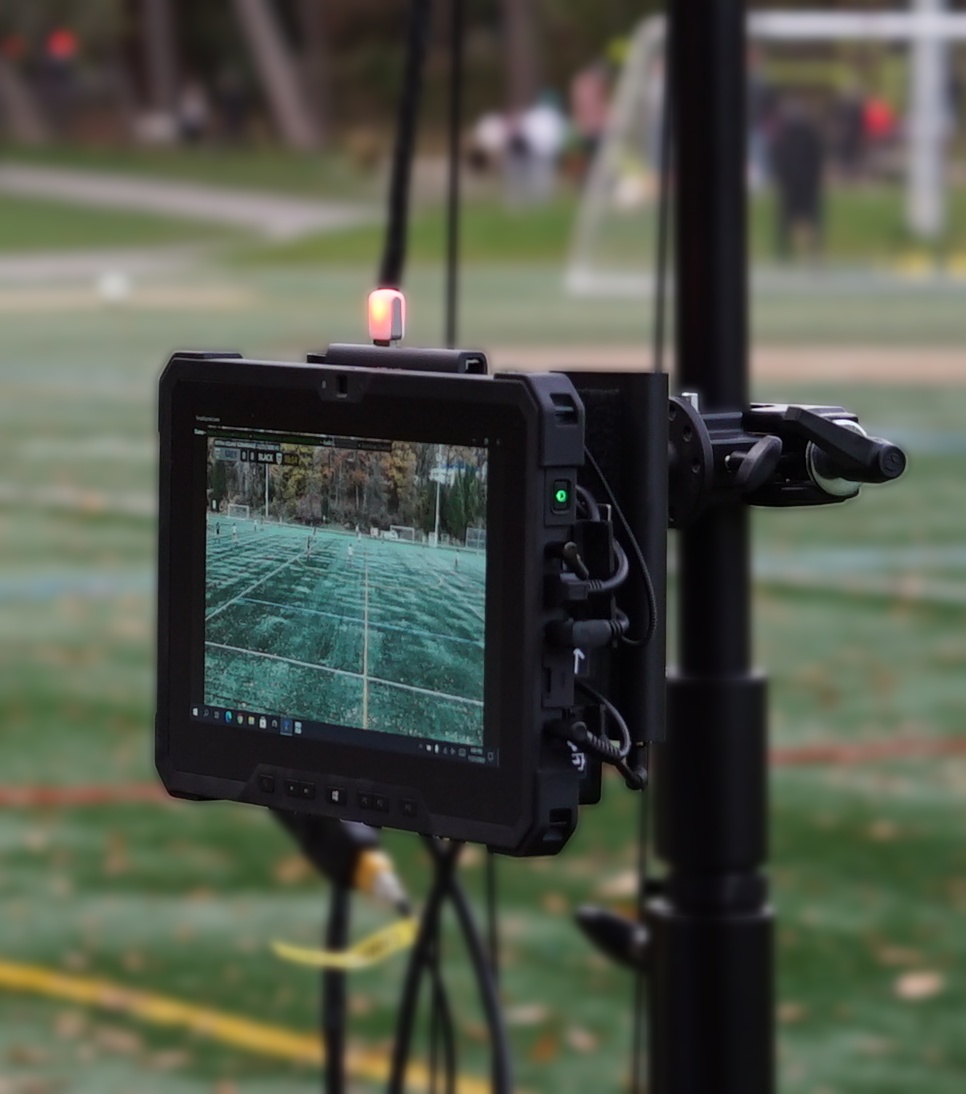
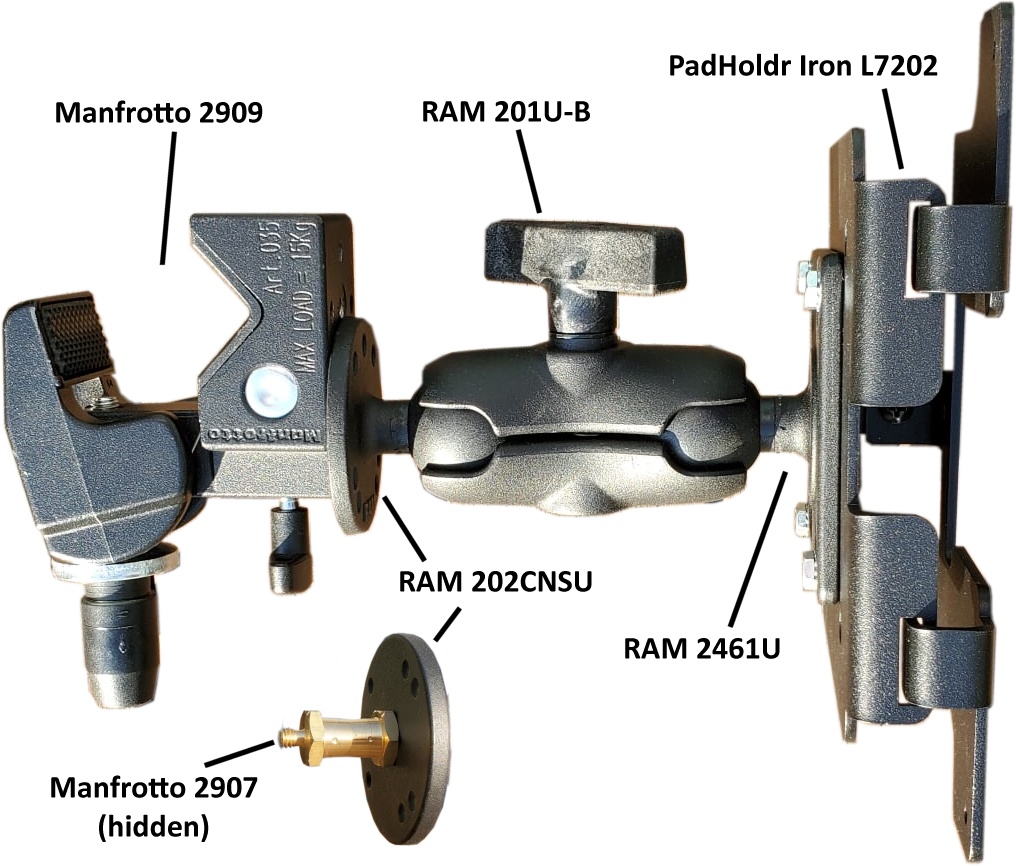
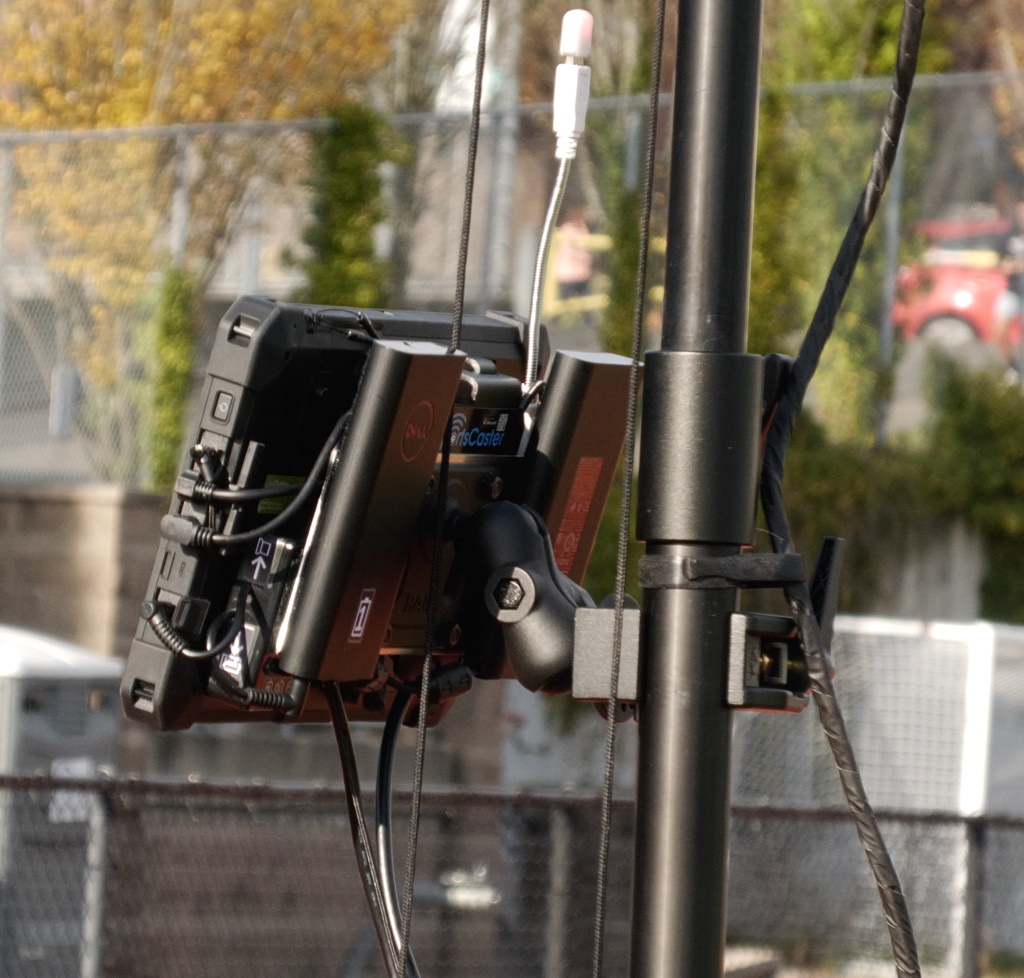
After some discussion with the club, we decided to build around the Dell Rugged Extreme Tablet because of its durability and weather resistance. We attached the tablet and all the accessories to the PadHoldr Iron L7202 mounting plate and then clamped the entire system onto the Hi-Pod pole using parts from Ram Mounts and Manfrotto.
The end result was a durable, one-piece unit that quickly attaches to the Hi-Pod and gets the club live and on-the-air with minimal fuss.
Each system we built for Seattle United included the tablet, mount and video connections, an on-air light, and external batteries with a custom switchbox to toggle between them. You may choose to mix and match the system components differently depending on your needs so we’ve split the system design into several sections, some of which are optional.
The parts lists are broken into several sections, the latter of which are optional. Prices shown were current as of November 2020.
This is the core of the system with the main components you need to run SimpleSportsCaster on a rugged tablet attached to a Hi-Pod pole. It doesn’t include some of the optional components like the on-air light or the external batteries. To be clear, even if you don’t add the external batteries, you’ll still need some kind of external power source to make it through a 2 hour game.
The single most expensive piece of the system is the Dell Rugged Extreme Tablet itself. We recommend a configuration with the Intel Core i7 processor, especially if you want to live stream and record simultaneously.
For live streaming, it’s extremely convenient to include one of the mobile broadband options but you can also tether your phone or use some other external mobile hotspot.
If you intend to record your games to the tablet, you’ll want a reasonably large hard drive or solid state storage. Recording high quality HD 1080p60 video at 50 mbps consumes over 20 gigabytes of storage per hour. Think about how many games you’ll want to save on the tablet before transferring them elsewhere and plan accordingly. Seattle United chose the 512 GB option which let’s them record an entire weekend worth of ECNL games without running out of space.
After the tablet, one of the most important components is the video capture device that allows the tablet to recieve the video feed from the camera on top of the Hi-Pod. We choose the Elgato HD60 S+ because it’s a high-quality device from a well-known manufacturer. It also has two HDMI ports which allows you to view the video feed on the tablet and on the Hi-Pod’s monitor at the same time. This is great if you have a two-person crew where one person operates the camera while viewing the Hi-Pod monitor and another operates the scoreboard and keeps statistics on the tablet.
| Manufacturer | Part | Quantity | Unit Cost | Total Cost | Description |
|---|---|---|---|---|---|
| Dell | 7220 Rugged Extreme Tablet | 1 | $2,542 | $2,542 | Intel Core i7-8665U model |
| Elgato | HD60 S+ | 1 | $200 | $200 | Video capture device with HDMI passthrough (Important! Get the S+ because the S model won’t work.) |
| PadHoldr | Iron L7202 | 1 | $73 | $73 | VESA adapter plate that screws to back of tablet |
| Manfrotto | Manfrotto 2909+2907 | 1 | $34 | $34 | Super clamp and short stud |
| Ram Mounts | RAM-201U-B | 1 | $22 | $22 | Short double socket arm for 1.5” ball bases |
| Ram Mounts | RAM-2461U | 1 | $19 | $19 | 75mm VESA plate with 1.5” ball |
| UsbFireWire.com | RR-ADCS-15GRC | 1 | $19 | $19 | 15” USB 3.1 down angle A-to-C cable to connect Elgato to tablet USB port |
| Ram Mounts | RAM-202CNSU | 1 | $18 | $18 | 1.5” ball base with 3/8”-16 female threads |
| CableCreation | Right Angle HDMI cable | 1 | $8 | $8 | 3’ right angle HDMI cable to connect Elgato pass-through to back-up monitor while shedding water. |
| CableCreation | HDMI angle adapters | 1 | $7 | $7 | pair of HDMI angle adapters to keep cables pointing down to shed rain |
| CableCreation | Left Angle HDMI cable | 1 | $6 | $6 | 3’ left angle HDMI cable extension to connect HDMI cable from camera to Elgato while relieving strain and shedding water. |
| Velcro | Heavy Duty 4x2 Inch strips (4 pack) | 1 | $6 | $6 | For mounting video capture device but also the USB hub, batteries and switch box if you include them |
| misc tools and hardware | nuts, bolts, screwdrivers, wrenches, thread lock glue, zip ties, label maker | ||||
| Total | $2,954 |
One requirement we wanted to satisfy was the ability to broadcast and record two complete games without needing to plug in or recharge. We determined that adding two Dell 65 watt-hour external batteries was enough to meet that requirement. The 4”x10” aluminum sheet provides a mounting surface for the batteries. You can use a different material like plastic if you prefer.
| Manufacturer | Part | Quantity | Unit Cost | Total Cost | Description |
|---|---|---|---|---|---|
| Dell | PW7015L 65 WHr Power Bank Plus | 2 | $110 | $220 | 2 external batteries per system, to allow recording and broadcasting two full games |
| ksmetals.com | KS257 4”x10”x0.064” aluminum sheet | 1 | $3 | $3 | mounting plate for batteries, USB hub, switch box |
| misc tools and hardware | drill press, drill bits, clamps, Velcro strips from above | ||||
| Total | $223 |
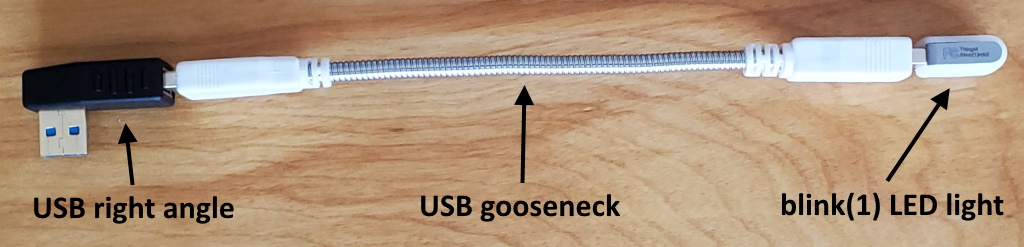
Adding an on-air light is a friendly way to remind people nearby that their voices might be heard on your live stream. SimpleSportsCaster can also flash the light as a low battery warning to the camera operator. We plug the light into a USB gooseneck extension to lift it above the tablet high enough to be visible from all sides. We also add a USB/network/HDMI hub as a convenience since the tablet has a limited number of ports.
| Manufacturer | Part | Quantity | Unit Cost | Total Cost | Description |
|---|---|---|---|---|---|
| Anker | PowerExpand+ 5-in-1 USB-C Ethernet Hub | 1 | $36 | $36 | USB port for on-air light plus extra ports for future use |
| ThingM | blink(1) mk3 USB RGB LED | 1 | $30 | $30 | on-air light |
| UsbFireWire.com | RR-CVCF-10GRNTP | 1 | $20 | $20 | 10” USB 3.1 down angle C-to-C cable to connect Anker USB hub to tablet |
| CableMatters | USB right angle adapter | 1 | $4 | $4 | connect gooseneck to USB hub |
| pccables.com | 70431 USB gooseneck cable | 1 | $3 | $3 | holder for on-air light |
| misc tools and hardware | Velcro strips from above | ||||
| Total | $93 |
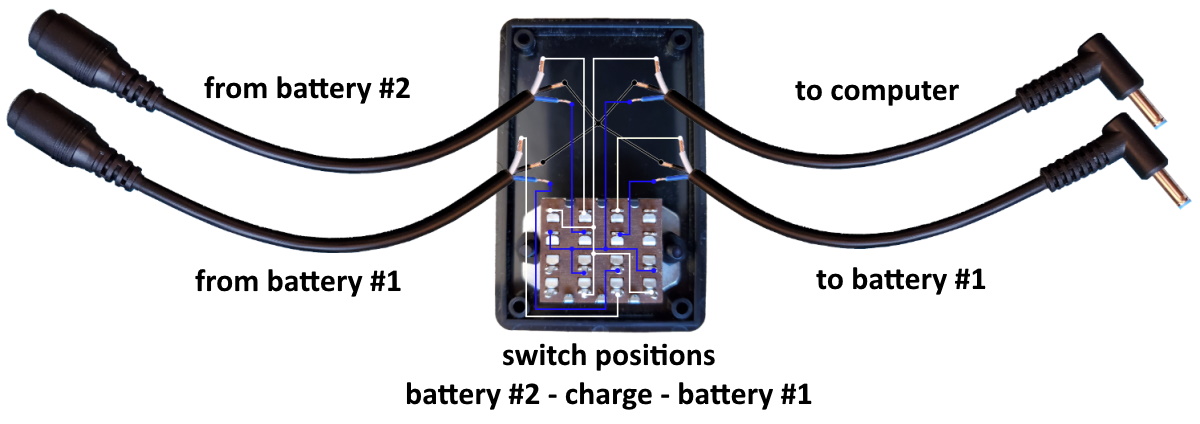
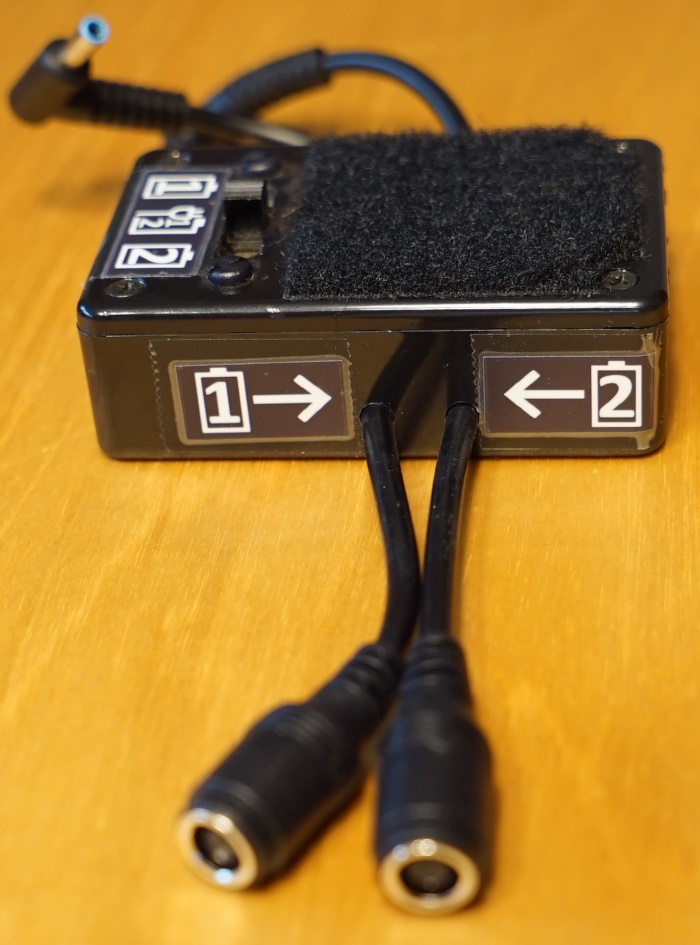
To simplify switching between the two external batteries, we built a little switch box that attaches to the back of the tablet. It has one position for each of the external batteries plus a third position that allows charging both batteries and the tablet from a single power adapter.
| Manufacturer | Part | Quantity | Unit Cost | Total Cost | Description |
|---|---|---|---|---|---|
| Njuone | 5 pack of Dell power cables | 1 | $13 | $13 | battery switch box connectors |
| Mouser.com | 1591MSBK plastic box | 1 | $4 | $4 | battery switch enclosure |
| Mouser.com | 4P3T slider switch | 1 | $3 | $3 | battery switch |
| misc tools and hardware | screws, nuts, solder, wires, drill, bits, screwdriver, soldering iron, wire cutter | ||||
| Total | $20 |
Many Hi-Pods come with the Sony HDR-CX405 camcorder. One quirk of this camcorder is that it doesn’t send any microphone audio out via HDMI. Unfortunately, this means you have to provide your own microphone if you want to have game audio in your live streams and recordings. If your camera provides live audio then you don’t need to purchase these parts.
| Manufacturer | Part | Quantity | Unit Cost | Total Cost | Description |
|---|---|---|---|---|---|
| CableCreation | right angle 3.5mm headphone extension 3ft | 1 | $7 | $7 | Stays plugged into tablet to receive audio feed from pole mounted microphone |
| YCS Basics | 3.5mm headphone extension 25 ft | 1 | $7 | $7 | Brings microphone feed down the camera pole |
| PowerDeWise | Omnidirectional label microphone | 1 | $36 | $36 | Mount next to Sony HDR-CX405 camera to provide audio feed |
| Total | $50 |
If you choose to add the Dell external batteries to your system, use the RAM 2461U VESA plate as a template to drill four holes through the KS257 aluminum plate as shown here:
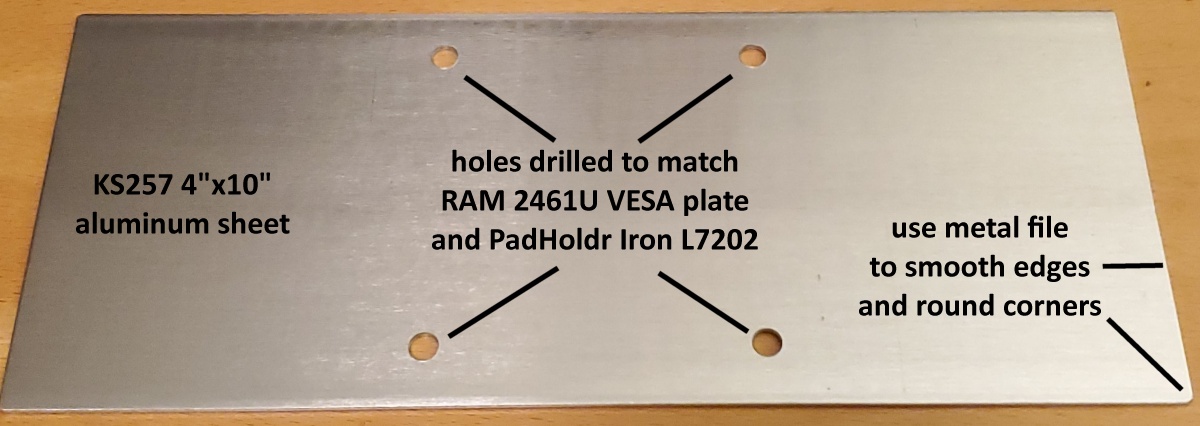
Use a metal file to smooth the sharp edges of the aluminum sheet and round the corners to make them safer to touch.
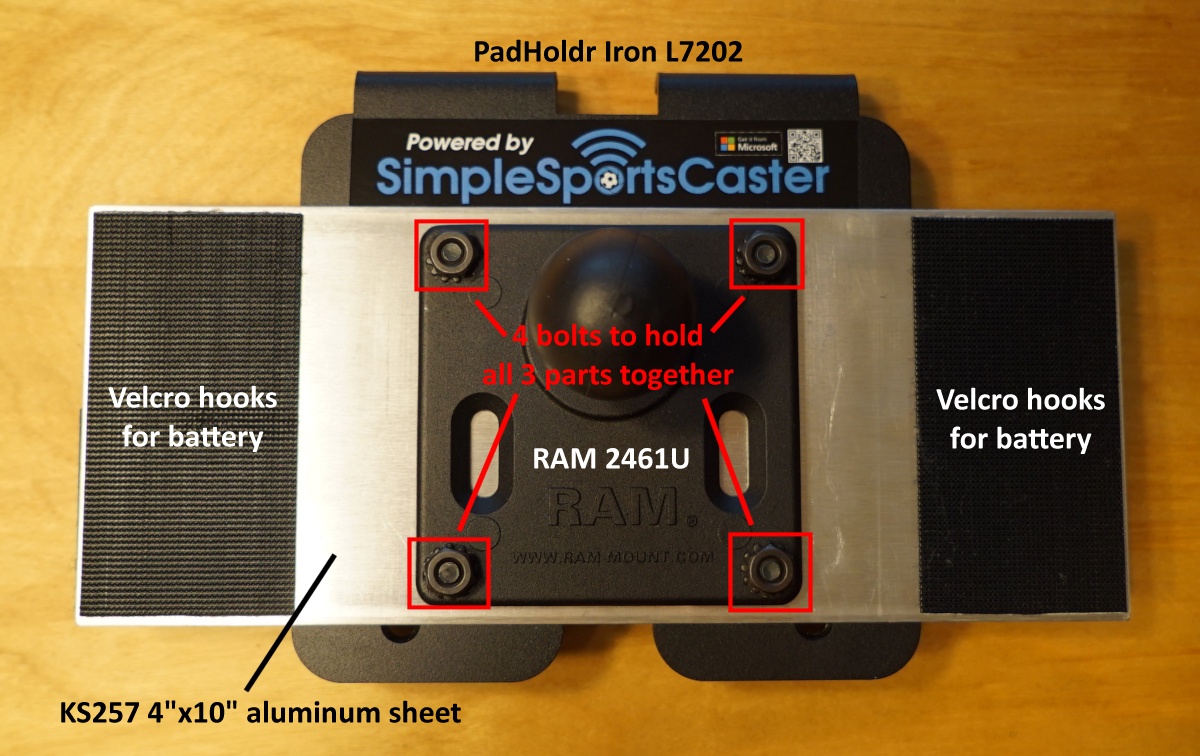
Sandwich the battery mounting plate between the PadHolder Iron L7202 and the RAM 2461U VESA plate and join all three pieces together with four nuts and bolts. If the bolts included with the PadHoldr kit are too long or too short then you’ll need to visit a hardware store to buy some bolts of the proper length.
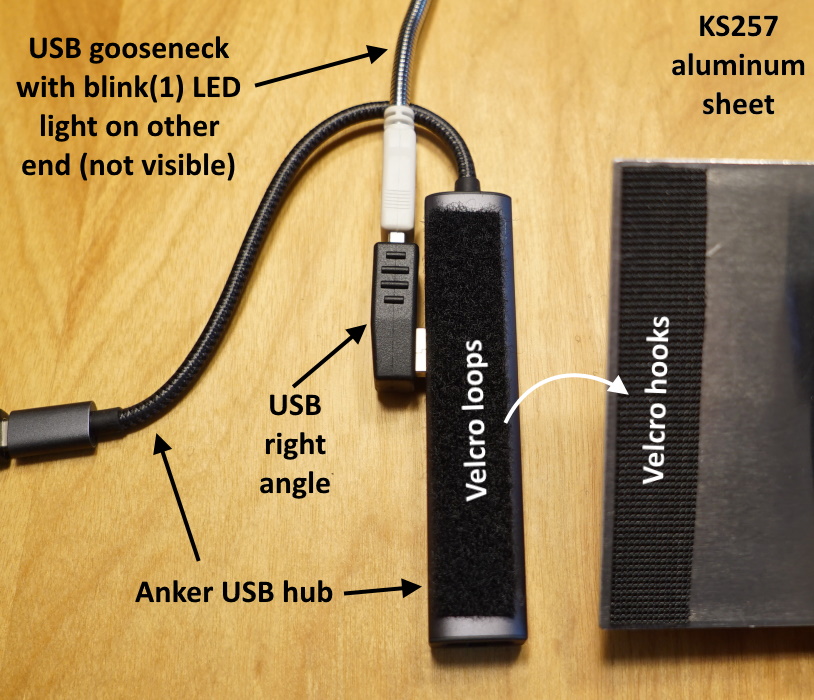
See the two images below for reference. Also note the location of the adhesive Velcro hook strips. Some of the Velcro is optional depending upon whether or not you plan to install the on-air light with Anker USB hub or the battery switchbox.
Assemble the clamp and tablet mount parts as shown below.
You may want to apply some thread lock glue on the Manfrotto 2907 short stud where it screws into the back of the RAM 202CNSU ball.
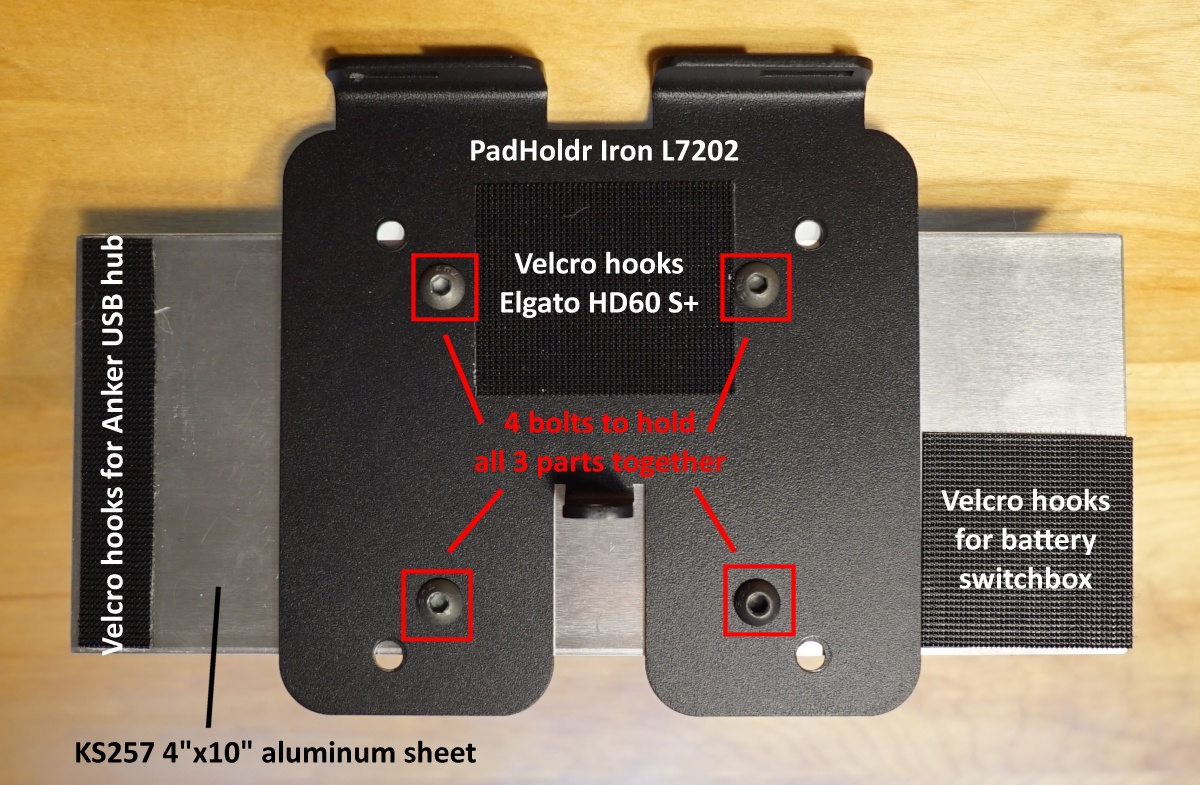
If you chose to build the battery mounting plate then you will have already joined the RAM 2461U to the PadHoldr Iron L7202 with the battery plate sandwiched in between.
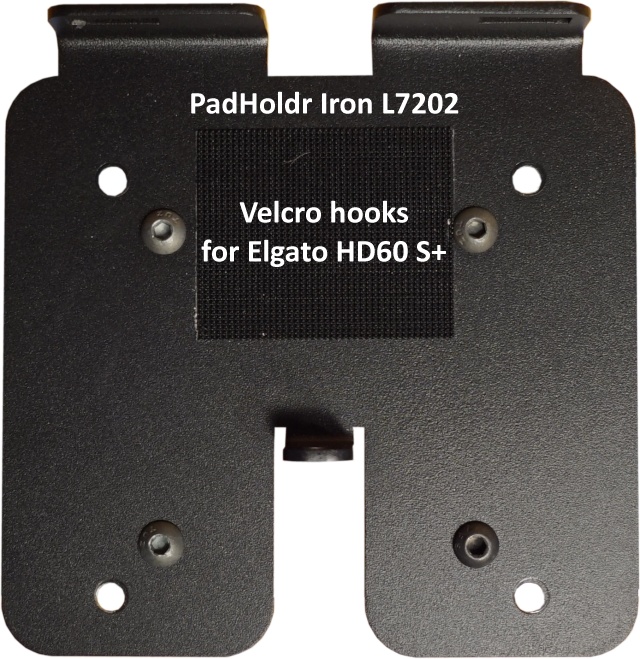
If you haven’t already done so, unscrew and separate the two halves of the PadHoldr Iron L7202. Place a strip of Velcro hooks on the inside of the half of the L7202 that is bolted to the RAM 2461U VESA plate. This Velcro strip will hold the Elgato HD60 S+ video capture device. This image shows where to place the Velcro.
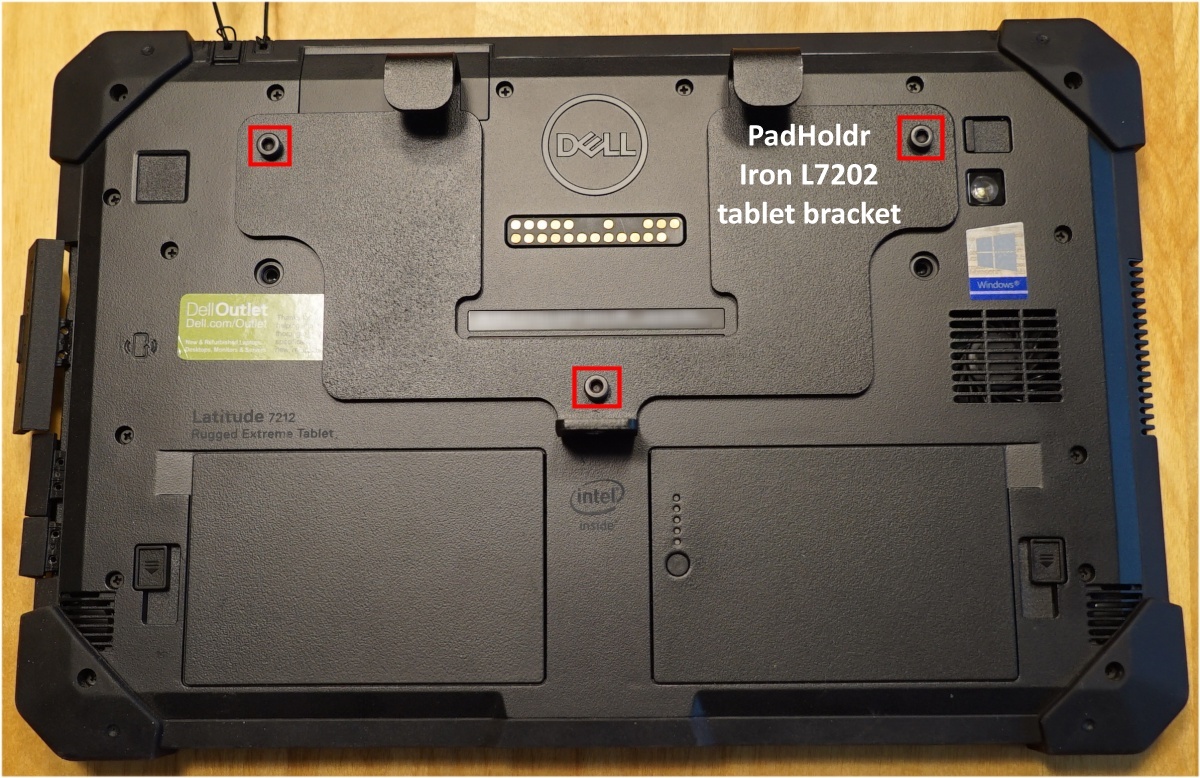
If you haven’t already done so, unscrew and separate the two halves of the PadHoldr Iron L7202. Attach the tablet bracket of the L7202 to the back of the Dell tablet using the included screws.
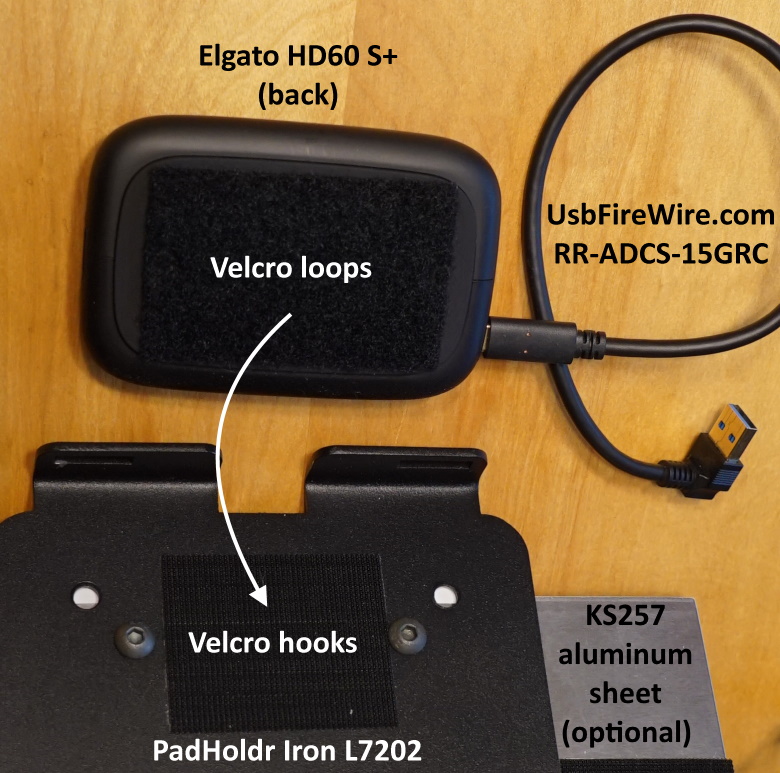
Attach a length of Velcro strip (loop side) to the back of the Elgato HD60 S+ video capture device. Then press it onto the Velcro hooks that you already attached to the inside of the PadHoldr Iron L7202 as shown below.
If you are building the on-air light option, plug the blink(1) LED light into one end of the USB gooseneck and the right angle USB adapter into the other end as shown below.
Attach a thin strip of Velcro loops on the back of the Anker USB hub. Plug the open end of the right angle adapter into the USB hub. Finally, attach the USB hub to the KS257 aluminum sheet by pressing the Velcro together as shown below.
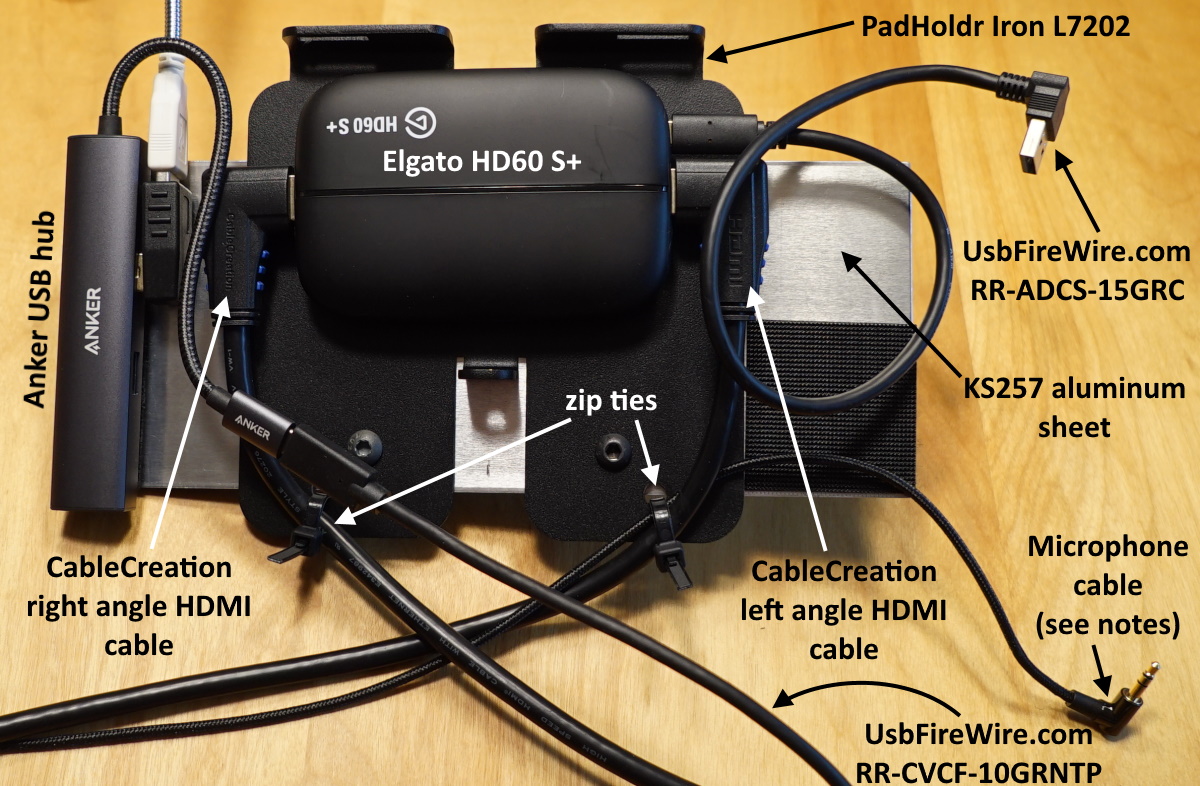
Now it’s time to connect the HDMI and USB cables to the accessories that you previously attached to the PadHoldr Iron L7202 tablet mount. Start by plugging the two CableCreation angled HDMI cables into the Elgato HD60 S+ as pictured below. Route them down toward the open holes at the bottom of the Iron L7202 and secure them with zip ties. This helps relieve the strain on the cables and where they connect to the HD60 S+.
Next, add the two USB extension cables from UsbFireWire.com. Plug the USB-C end of the RR-ADCS-15GRC cable into the HD60 S+. Also connect the female end of the RR-CVCF-10GRNTP cable to the male USB-C connection on the Anker USB hub.
Note: The image below includes a stereo microphone cable. This was necessary in the case of the Seattle United build because the Sony HDR-CX405 Hi-Pod cameras don’t send audio via HDMI. This was solved by mounting a small lapel microphone next to the camera and running a long microphone lead down to the bottom of the Hi-Pod pole. That lead was then plugged into a 3 foot audio extension cable, one end of which is pictured below and is plugged into the microphone input on the Dell Rugged Extreme Tablet. Most cameras send both audio and video via HDMI so the extra microphone isn’t usually necessary.
To make things easier for your film crew, it’s nice to label the video cables. Note: If you added an external microphone for your Sony HDR-CX405 Hi-Pod camera then it’s nice to label that too.

With all the video and data connections in place, you can now join the two halves of the PadHoldr Iron L7202 back together again. Lay the tablet face down and slide the slots on the other half of the L7202 onto the hooks on the tablet bracket as shown below.
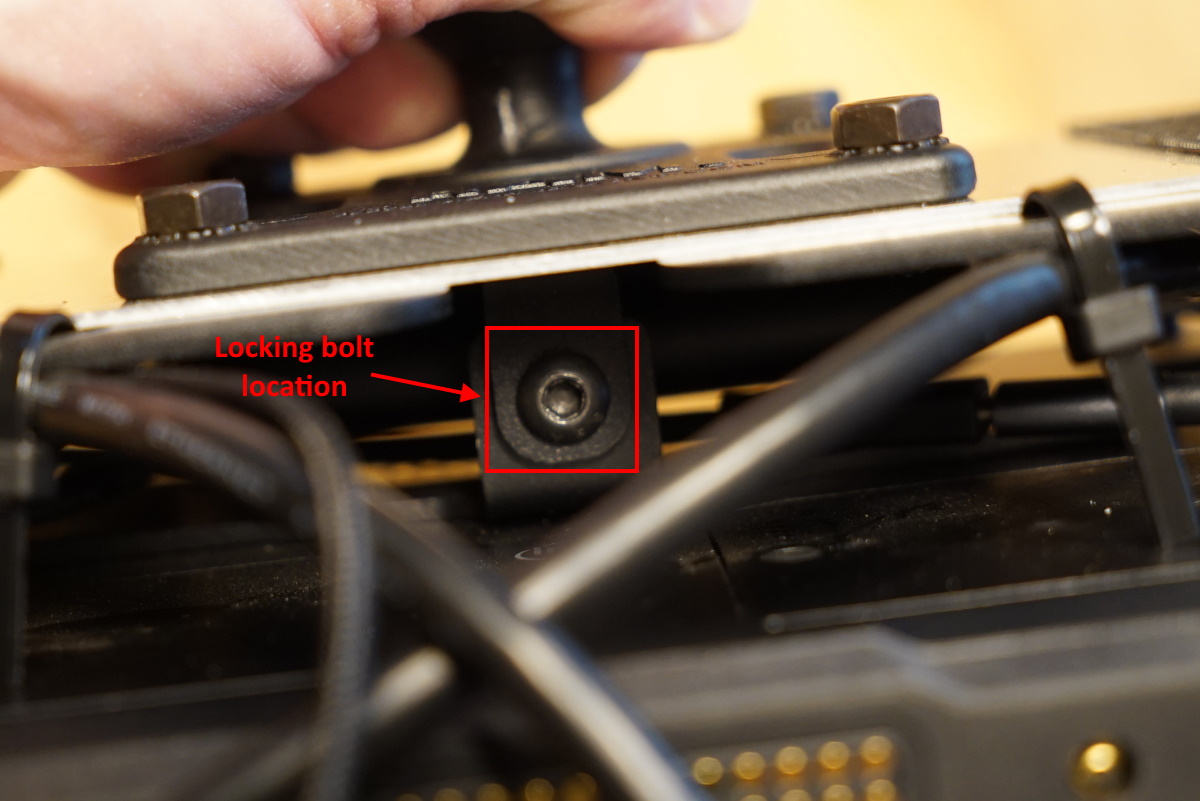
Use a long Allen wrench to screw in the bolt that locks the two halves of the PadHoldr Iron L7202 together.
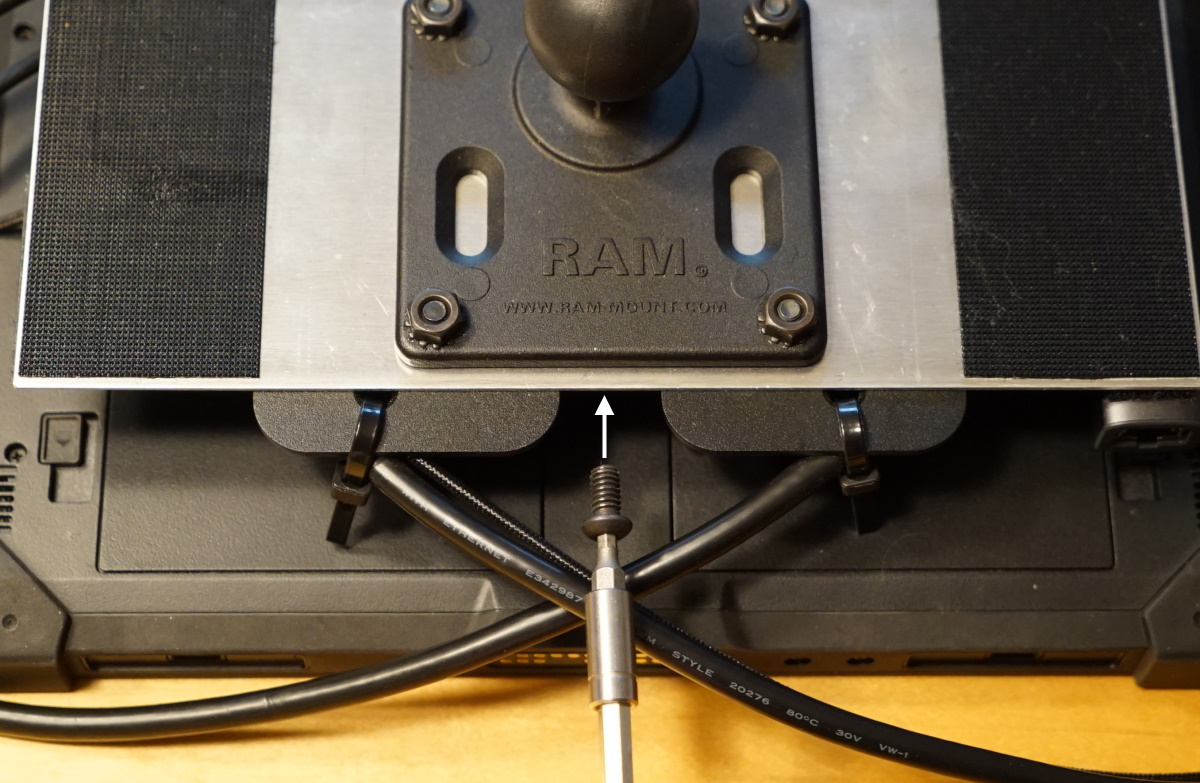
This image shows the locking bolt in position after being tightened.
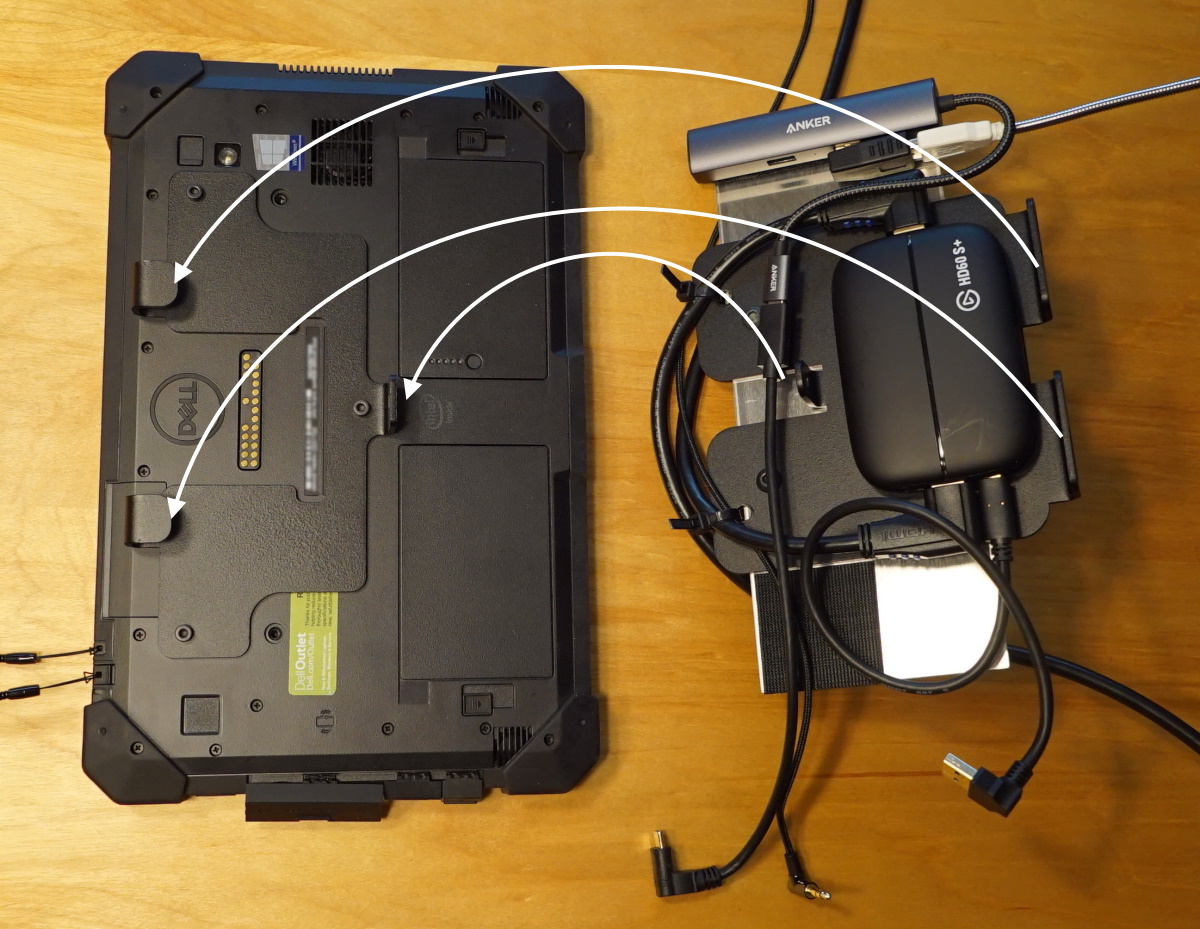
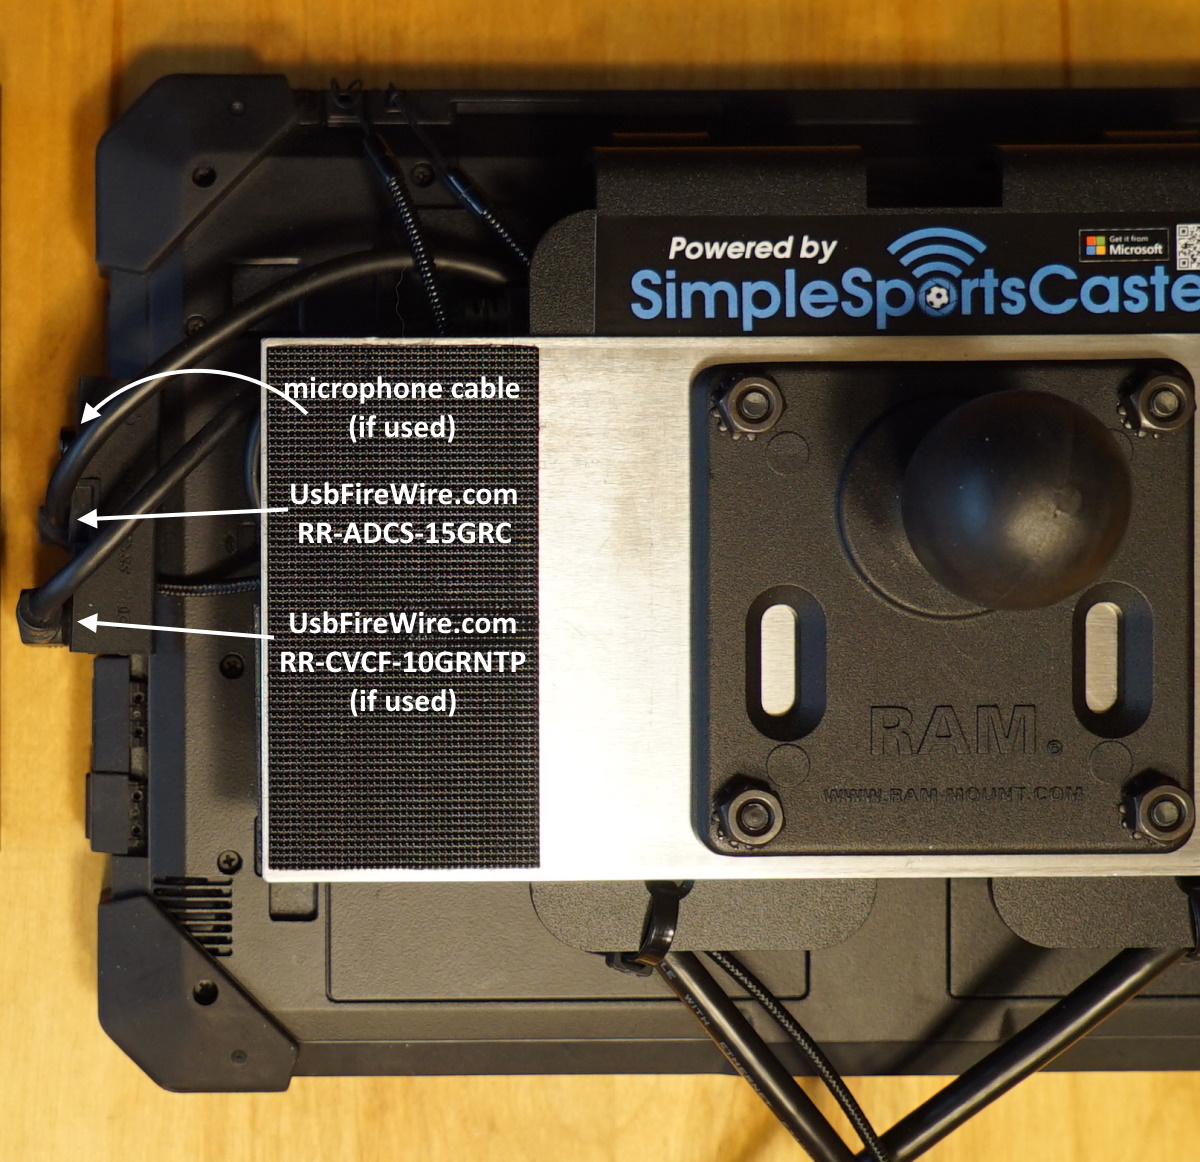
Open the data port door on the side of the tablet and plug in the USB cables and, if used, the microphone cable as shown below.
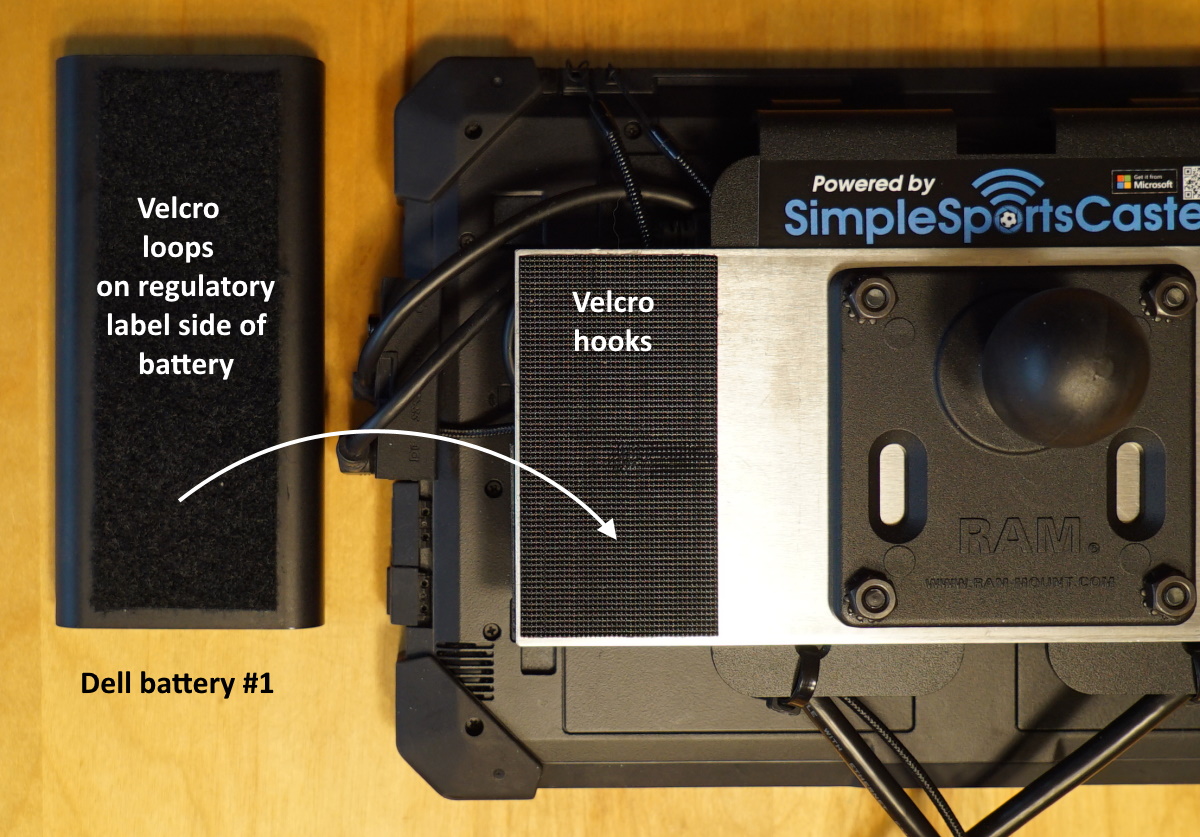
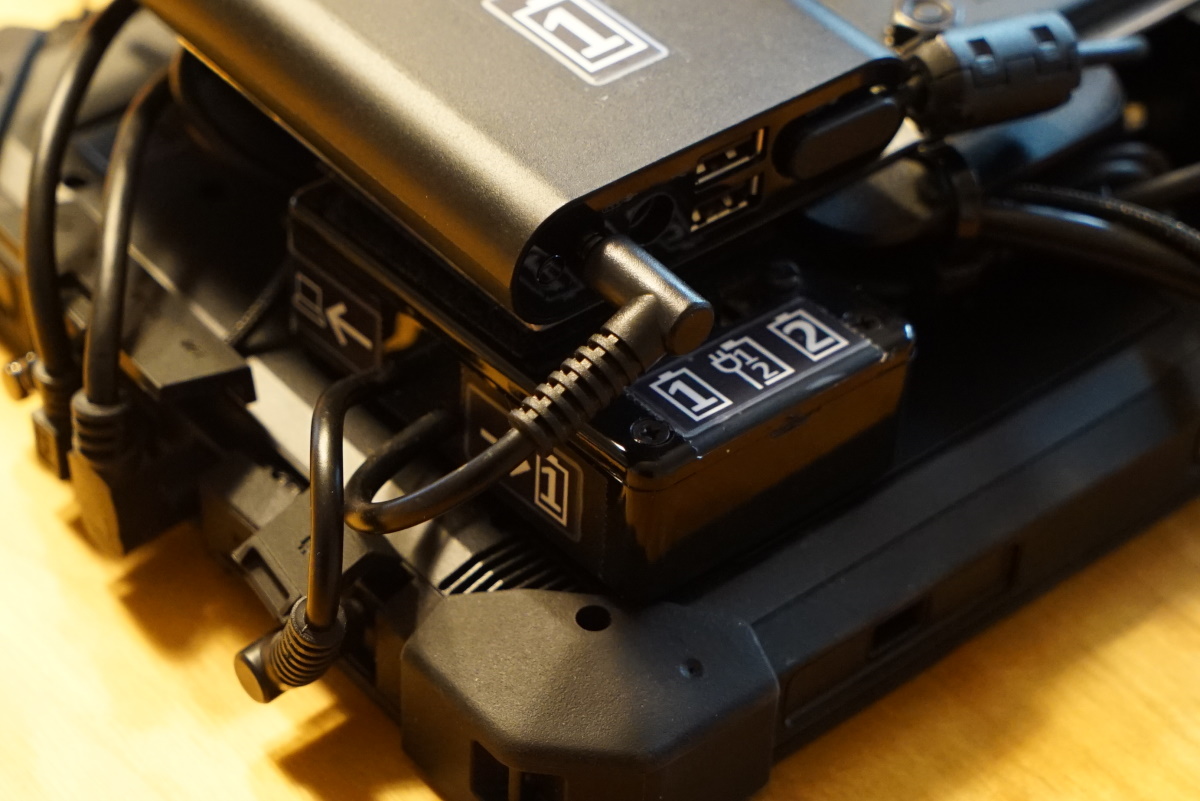
If you chose to use the external Dell batteries then you can attach them now. Start by placing the tablet face down on a table.
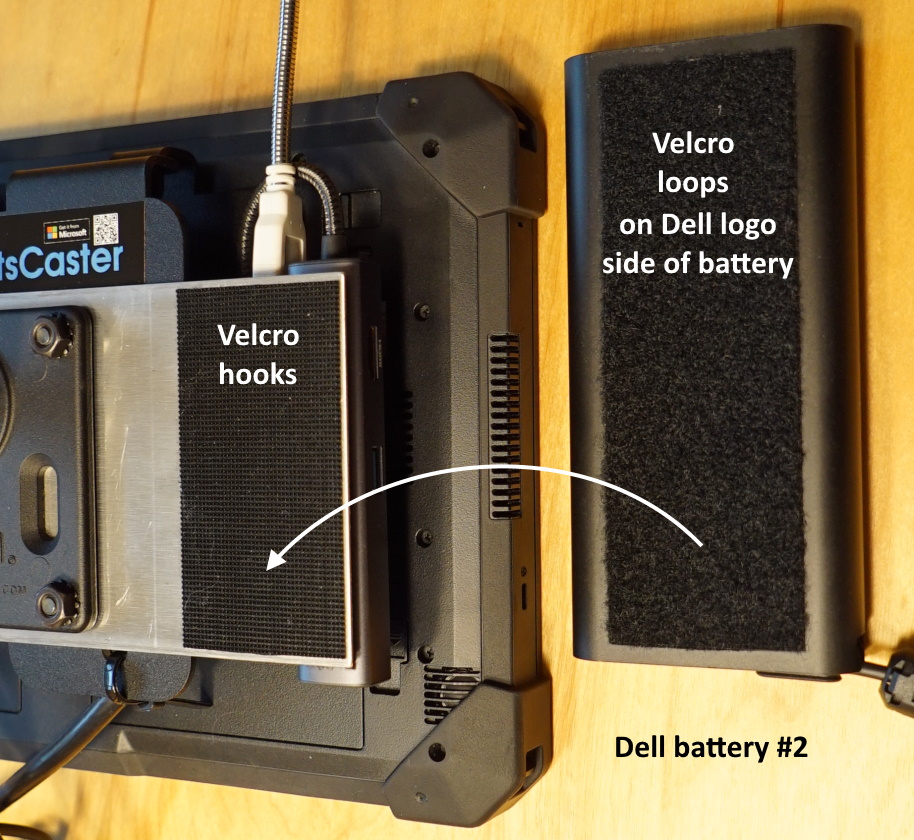
Attach a strip of Velcro loops over the regulatory label of the first battery. Then flip it over and orient it so that the power plug is facing down and the power cable is directed toward the center of the tablet. Press it onto the Velcro hooks on the left side of the KS257 aluminum sheet as shown below.
Attach a strip of Velcro loops over the Dell logo on the second battery. Note that the Velcro for battery #2 goes on the opposite side that you used for battery #1. The reason is so the power output for battery #2 will also be on the bottom and directed toward the center of the tablet. Press the second battery onto the Velcro hooks on the right side of the KS257 aluminum sheet as shown below.
If you don’t plan to buld the battery switchbox, then you can route the battery power cables from the batteries to near the power plug on the tablet. Without the switchbox, you’ll switch batteries by swapping plugs.
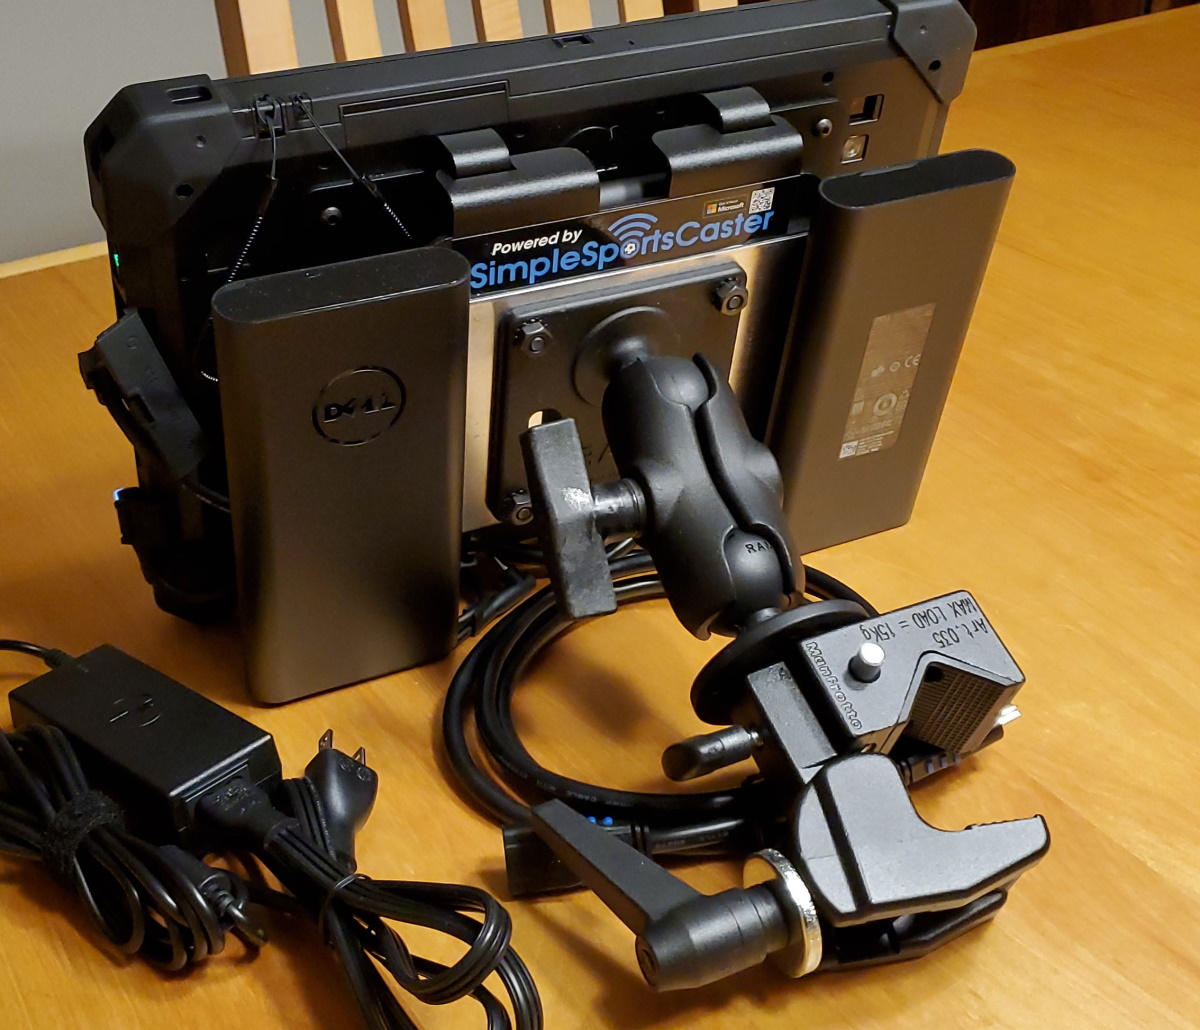
If you put the clamp arm back on at this point then the back of the tablet will look like this. (Note, when this photo was taken the on-air light wasn’t installed.)
The battery switchbox makes it easy to toggle between the two external Dell batteries without having to move power plugs around. The switchbox also has a third (middle) position that makes it possible to charge both external batteries and the tablet’s internal batteries with just one power supply.
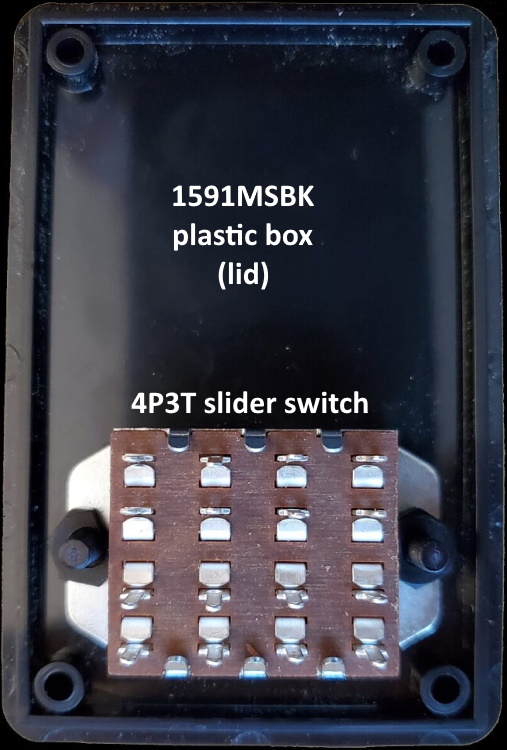
Start with the 1591MSBK plastic box and cut holes in the lid so you can mount the switch as far to one end of the box as possible. We used black nylon nuts and bolts to secure the switch to the lid.
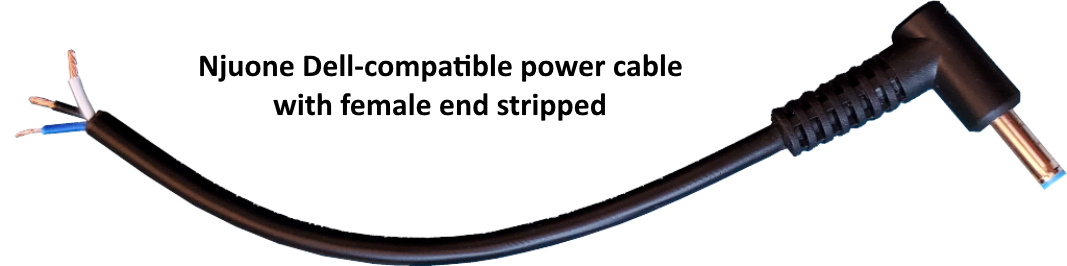
Next, grab two of the Njuone Dell-compatible power cables and cut the male end off and strip the three wires inside the cable. Like this:

Cut the female end off two more Dell power cables and strip those wires too.
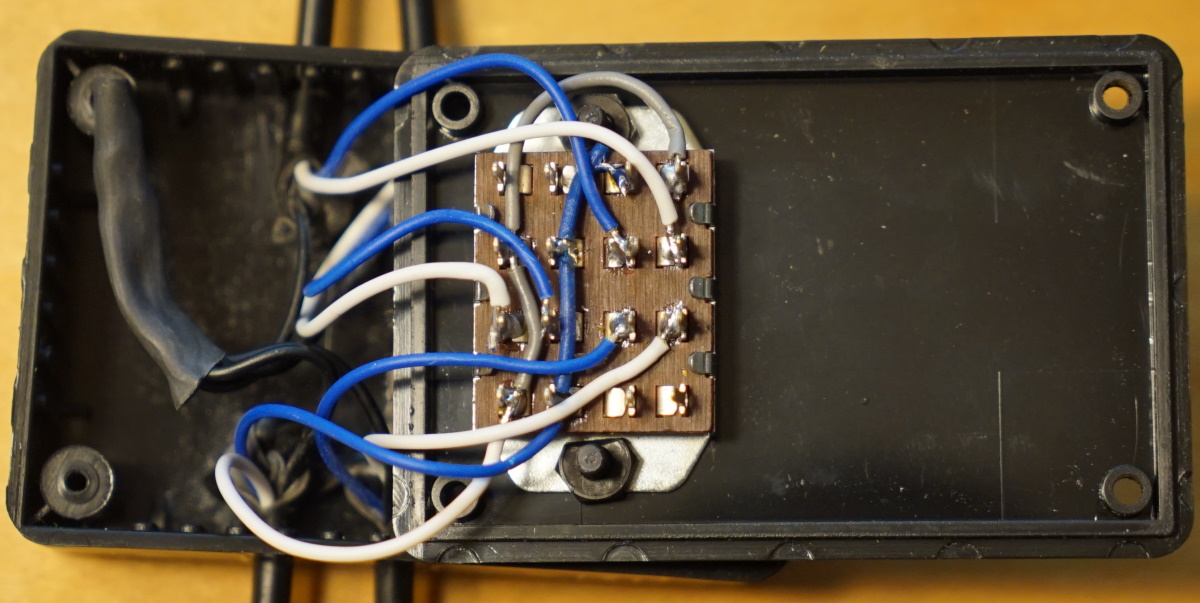
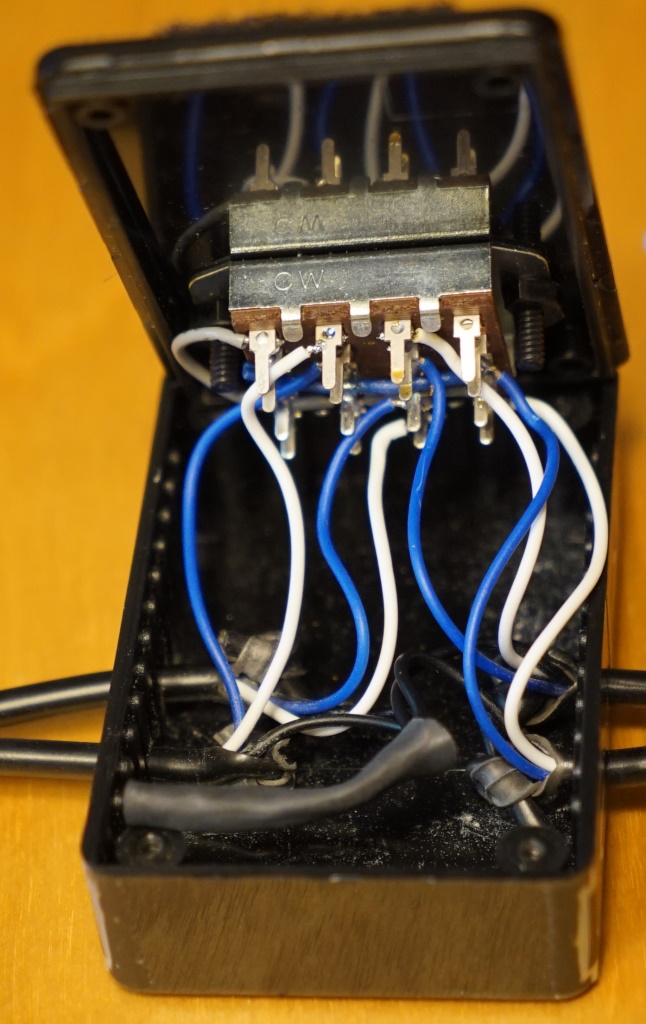
Drill 2 holes on each side of the 1591MSBK plastic box to allow you to insert the stripped ends of the power cables. Then solder the wires to the switch leads as shown below.
Here are a couple views of the switchbox with the wiring complete and the cover open.
If you have a label printer, you can print these labels for the outside of the box.

Cut a piece of Velcro loops to put on the outside of the box lid above the switch. Here is a view showing where to put the Velcro on the lid. It also shows the label for the switch.
The following two views show where to place the labels on the sides of the box.
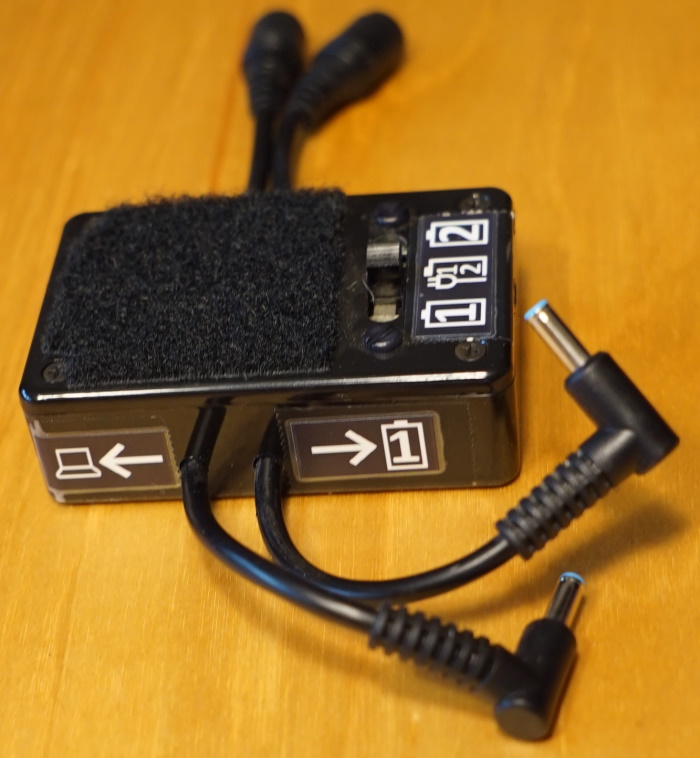
Slide the switchbox between the tablet and the battery mounting plate near the tablet’s power jack as shown below. Press the Velcro together to hold it in place.
The rightmost three labels on the label strip above are for the batteries. In the image above you can see the label for battery #1. Put the label for battery #2 on the other battery.
The last label with the battery, lightning bolt, and arrow also goes on battery #2 with the arrow pointing to the power jack. When you want to charge both external batteries and the tablet’s internal battery at the same time, move the switchbox switch to the center position and plug an external battery charger into battery #2. Power will flow through battery #2, to battery #1, then into the tablet, charging all three batteries at once.
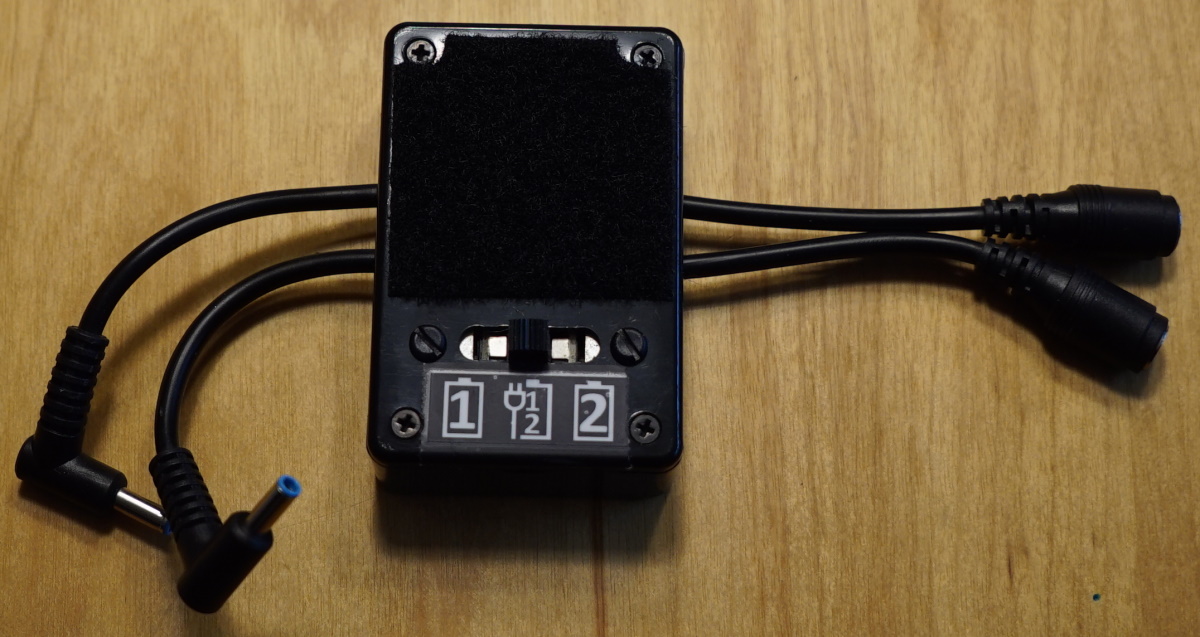
Here are a few views of the completed tablet project.
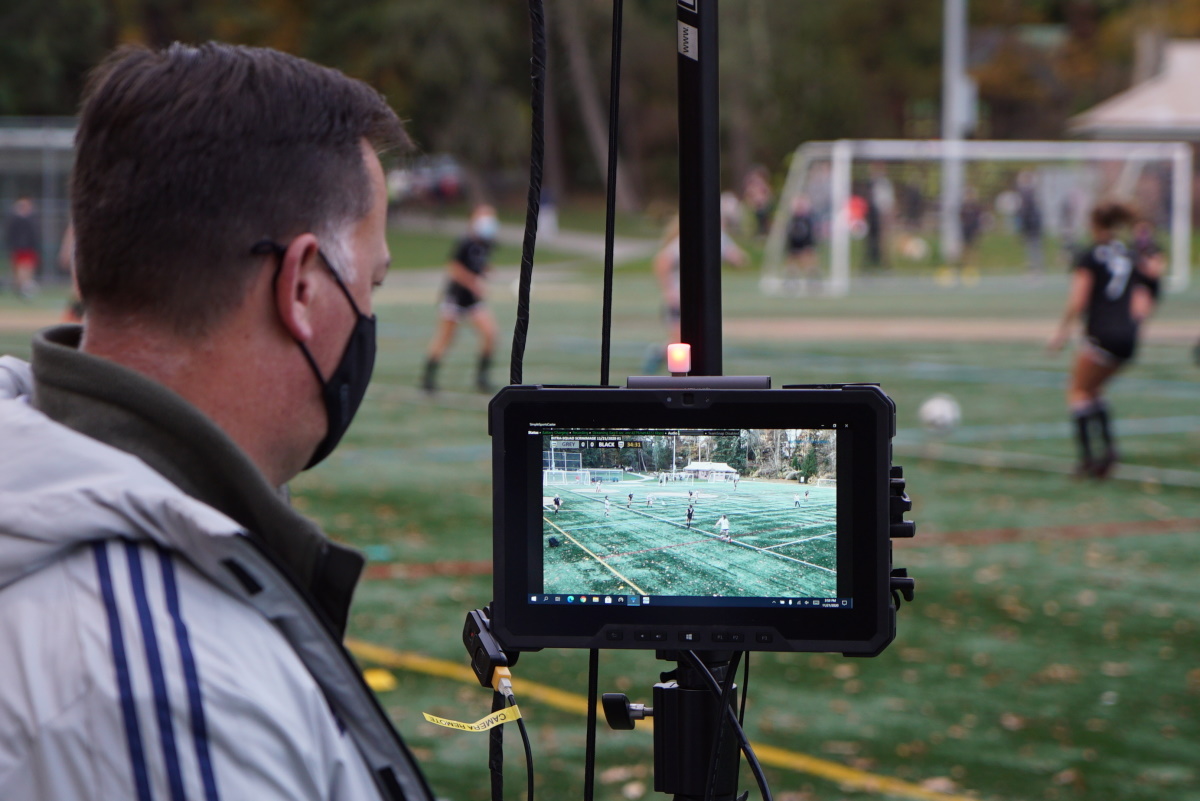
These tablets have been great for Seattle United, especially during 2020 when games have been extremely limited due to COVID restrictions. Having video of intra-team scrimmages has been crucial for athletes in the club hoping to play in college. Since spectators haven’t been allowed at most of these scrimmages, parents have enjoyed being able to watch the live streams broadcast from the club tablets.
We’d like to add one final word about the weather. Even though the Dell Rugged Extreme Tablets are able to operate in wet environments, they lose some of their moisture resistance with the data and power doors open on the side. Also, the USB devices, HDMI video connections, and batteries still need to be kept dry.
To help keep the rain off, we made three custom-fit, clear vinyl covers for each of the tablet systems. If there’s sufficient interest we can share those plans with you. Otherwise, plan to keep the tablets out of the rain as much as possible with an umbrella or tent overhead.